How to Take the Blade Off of a Lawn Mower
Learn how to take the blade off of a lawn mower safely and easily. Step-by-step guide with tools, tips, and common mistakes to avoid for DIY blade removal.
Learning how to take the blade off of a lawn mower is a key skill for any homeowner. A sharp blade keeps your grass healthy and your lawn looking great. Dull blades tear grass, which can lead to disease. This guide walks you through the entire lawn mower blade removal process safely and efficiently. You will learn the tools you need, the steps to follow, and important safety tips. Whether you are removing lawn mower blade for sharpening or replacing it, this article covers everything. We also cover maintenance tips to extend blade life. Follow along to master this essential yard care task.
Before you start, always prioritize safety. A mower blade is sharp and can cause serious injury. Disconnect the spark plug wire to prevent accidental starts. Wear heavy work gloves and safety glasses. Work on a flat surface. If your mower has a battery, remove it. These precautions are critical for safe lawn mower blade removal.
Different mowers have different blade setups. Most walk-behind mowers use a single blade bolted to the crankshaft. Some have a nut or bolt in the center. Others may have a bolt on top of the blade adapter. Knowing your mower type helps you plan. Check your owner’s manual for specific instructions. This guide covers general steps that work for most models.
Key Takeaways
- Main Point: Lawn mower blade removal is a straightforward DIY task that improves mowing performance and lawn health.
- Actionable Advice: Always disconnect the spark plug and wear gloves before attempting how to take the blade off of a lawn mower.
- Best Choice/Practice: Use a socket wrench with a breaker bar for stubborn bolts, and mark the blade orientation before removal.
- Expert Insight: Sharpen or replace blades at least once per season for optimal cutting and to reduce engine strain.
- Summary: Follow the step-by-step guide to safely remove, inspect, and replace your mower blade for a perfect cut every time.
Gather the Right Tools for Lawn Mower Blade Removal
Having the correct tools makes lawn mower blade removal easier and safer. You do not need a big workshop. Most tools are common household items. Here is what you will need.
- Socket wrench set – Typically a 13/16 inch or 15/16 inch socket for most mower blades. Check your owner’s manual for exact size.
- Breaker bar – A long handle gives extra leverage to loosen tight bolts.
- Wood block or blade locking tool – A 2x4 piece of wood wedged between the blade and mower deck prevents blade from spinning.
- Heavy work gloves – Protect your hands from sharp edges.
- Safety glasses – Shield your eyes from debris.
- Penetrating oil – Like WD-40, to loosen rusted bolts.
- Torque wrench – For reinstalling the blade to the correct tightness (recommended but optional).
With these tools ready, you can efficiently perform how to take the blade off of a lawn mower without frustration. A breaker bar is especially helpful if the bolt is very tight from previous installation or rust. Soak the bolt with penetrating oil 10 minutes before starting. This simple step can save you time and effort.
Step-by-Step Guide: How to Take the Blade Off of a Lawn Mower
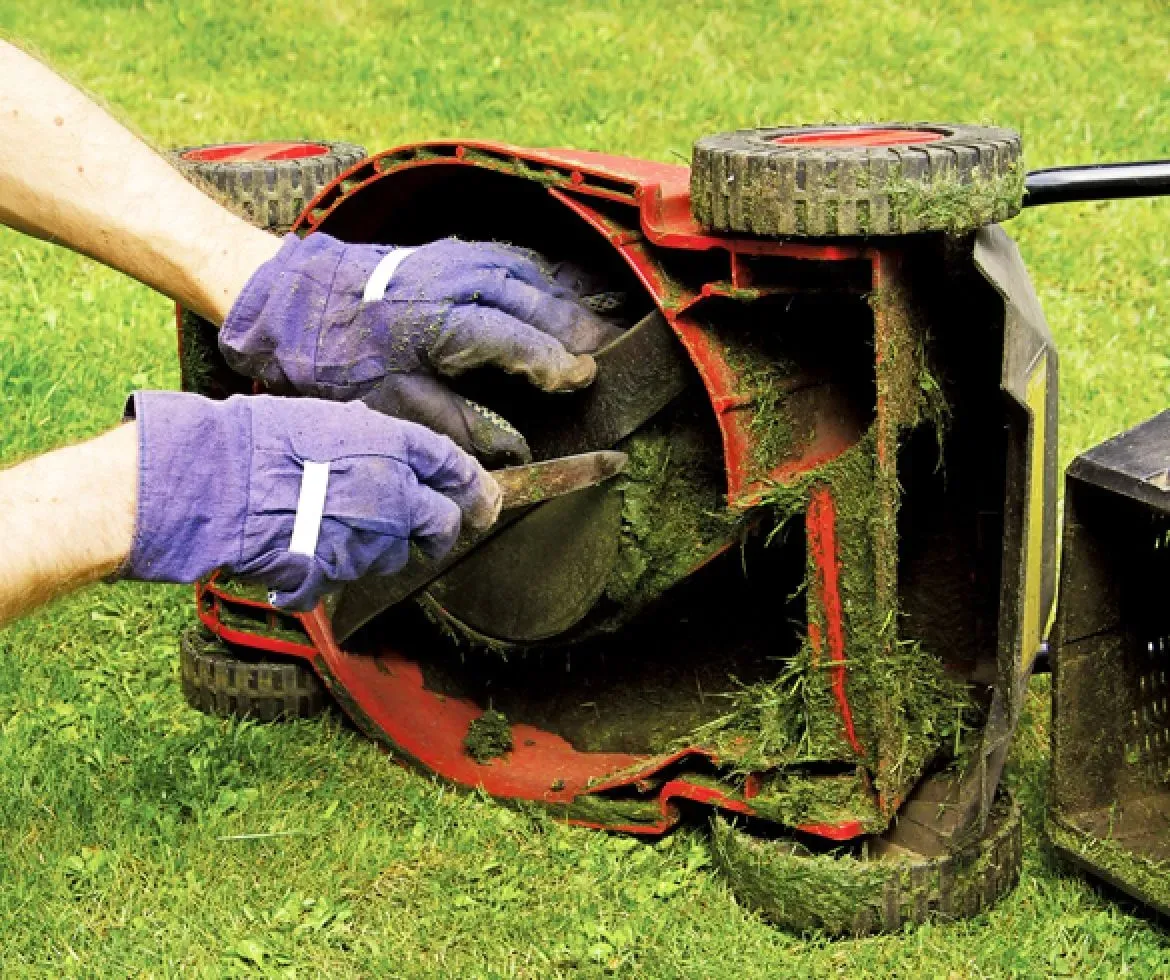
Follow these steps carefully to safely remove lawn mower blade. Always double-check that the engine cannot start. Place the mower on a flat surface and tip it on its side with the carburetor facing up (if possible) to avoid oil leaks. If you have a four-stroke mower, tipping it the wrong way can cause oil to spill into the air filter. Check your manual.
- Disconnect the spark plug wire – Pull the wire from the spark plug and secure it away from the plug. This is the most important safety step.
- Drain the fuel – If the mower has a fuel shut-off, turn it off. Otherwise, siphon or drain the gas tank to prevent spills when tipping.
- Tip the mower safely – Tilt the mower so the carburetor side (usually the side with the air filter) faces up. This prevents oil from entering the air filter. Use a block or stand to keep it stable.
- Locate the blade and bolt – The blade is attached to the crankshaft by a central bolt or nut. Note the blade’s orientation – the sharpened edge should face the direction of rotation (usually clockwise).
- Block the blade – Wedge a piece of wood (2x4) between the blade and the deck housing to lock it in place. This prevents the blade from spinning when you apply force.
- Loosen the bolt – Use your socket wrench and breaker bar. Turn the bolt counterclockwise (lefty-loosey). If it is very tight, apply steady pressure. You may need to tap the breaker bar with a rubber mallet. Never use a pipe extension on the socket wrench unless it is designed for it.
- Remove the blade – Once the bolt is loose, take it out by hand. Then slide the blade off the crankshaft stud. Note any washers or spacers and keep them in order for reinstallation.
That completes the lawn mower blade removal process. Now you can sharpen the blade or install a new one. If you are replacing, ensure the new blade matches your mower model. For sharpening, use a file or bench grinder, maintaining the original bevel angle.
💡 Pro Tip
To easily loosen a stubborn blade bolt, apply penetrating oil and let it sit for 10 minutes. Then use a breaker bar with a steady push. Avoid using an impact wrench if you plan to reuse the bolt, as it can damage threads.
Common Mistakes to Avoid When Changing Lawn Mower Blades
Even experienced DIYers make errors during lawn mower blade replacement. Here are common pitfalls and how to avoid them. Steer clear of these to ensure safety and performance.
- Not disconnecting the spark plug – This is the number one safety mistake. Always remove the spark plug wire.
- Using the wrong socket size – Stripping the bolt head makes removal much harder. Double-check the size.
- Installing the blade upside down – Most blades have a “this side up” marking or the grass-cutting side is typically the side with the longer bevel. Check your blade orientation.
- Over-tightening the bolt – Use a torque wrench set to the manufacturer’s specification (usually 30-50 ft-lbs). Too tight can strip threads; too loose can cause the blade to come off.
- Ignoring blade balance – After sharpening, check balance with a blade balancer. An unbalanced blade causes vibration and premature wear.
Avoiding these mistakes makes how to take the blade off of a lawn mower a simple, repeatable task. Also, remember to clean the deck and blade area while you have the mower tipped. This is a great time for lawn mower blade maintenance.
⚠️ Important Note
Always disconnect the spark plug wire before any blade work. A mower can accidentally start even with the key off. Never place your hand near the blade while the spark plug is connected.
When to Replace vs. Sharpen the Mower Blade
Knowing whether to sharpen or replace the blade is part of effective lawn mower blade maintenance. Sharpening extends the life of a blade, but replacement may be necessary when the blade is too worn or damaged.
Signs You Only Need to Sharpen
Check the cutting edge. If the edge is dull but not nicked or bent, sharpening is the best option. You can sharpen a blade several times over its life. A good rule is to sharpen after every 25 hours of mowing. A sharp blade produces clean cuts and uses less fuel.
Signs You Need a New Blade
Replace the blade if you see any of these: deep nicks or cracks, a bent blade (spin the blade to check), excessive wear (the cutting edge is rounded or thinned), or if the blade cannot be balanced after sharpening. A damaged blade can cause poor cut quality and risk breaking during operation. Safety comes first. Also, if your mower is old, a new blade can restore cutting performance.
Regular inspection is key. When you perform lawn mower blade removal, take time to examine the blade under good light. Remove any grass buildup from the blade and deck. If you are unsure, replace the blade. They are affordable compared to the cost of engine damage from a blade failure. For more on routine engine care, check out our guide on how to change oil in lawn mower.
Reinstalling the Blade Correctly
After sharpening or replacing, you must reinstall the blade properly. Reinstallation is the reverse of removal, but pay close attention to torque and orientation.
- Place the blade on the crankshaft stud. Ensure it faces the correct direction – usually the side with the part number faces away from the mower deck. The cutting edge should lead when the blade spins (typically the sharper edge is on the opposite side of the lifting wing).
- Reinstall any washers or spacers in the order you removed them. Many mowers have a large washer, then a lock washer, then the bolt.
- Thread the bolt by hand to avoid cross-threading. Then tighten it with the socket wrench. Use a torque wrench if available. Typical torque is 30-50 foot-pounds. If not, tighten firmly but do not overtighten.
- Remove the wood block and spin the blade by hand to ensure it rotates freely and does not hit the deck.
- Return the mower to its upright position. Reattach the spark plug wire. Refill with fresh fuel if you drained it.
- Start the mower and test on a small patch of grass. Listen for unusual vibrations and inspect cut quality.
Following these steps ensures safe operation and extends the life of your equipment. For more fundamental starting procedures, see our article on how do you start lawn mower.
Frequently Asked Questions
How often should I remove and sharpen the lawn mower blade?
Sharpen the blade every 25 hours of mowing, or at least once per season. If you hit rocks or roots, inspect immediately. Frequent lawn mower blade removal for maintenance keeps the cut clean.
Can I remove the blade without tipping the mower?
It is possible on some mowers with a side access port, but most walk-behind mowers require tipping. If you have a zero-turn or riding mower, use a jack or raise the deck. Never reach under without securing the blade.
What size socket do I need for my mower blade?
Most mowers use a 13/16 inch, 15/16 inch, or 18mm socket. Check your owner’s manual. Using the correct size prevents stripping the bolt head. A socket set with these common sizes is a good investment for lawn mower blade replacement.
Why is my blade bolt so tight?
Bolts are often tightened with an impact wrench at the factory. Rust and debris also add resistance. Spray penetrating oil, let it soak, and use a breaker bar. The bolt thread direction may be reversed on some mowers – check your manual.
Conclusion
Mastering how to take the blade off of a lawn mower is a valuable skill that saves money and improves your lawn’s appearance. With the right tools and safety precautions, you can perform this task in under 30 minutes. Regular lawn mower blade removal for sharpening or replacement ensures a clean cut and reduces engine strain. Always prioritize safety by disconnecting the spark plug and wearing gloves. Follow the steps outlined in this guide for a smooth experience. After reinstalling, check cut quality and re-torque the bolt after the first hour of use. Consistent lawn mower blade maintenance will keep your mower running longer and your grass looking its best.
By learning to remove the blade yourself, you avoid trips to the repair shop and gain confidence in maintaining other parts of your mower. Pair this knowledge with regular oil changes and air filter cleaning for a reliable machine. Happy mowing!